Well, following on from the last interesting but somewhat downer of a post, I thought I’d do a bit of an update / introduction for a tree that hasn’t been on the blog before.

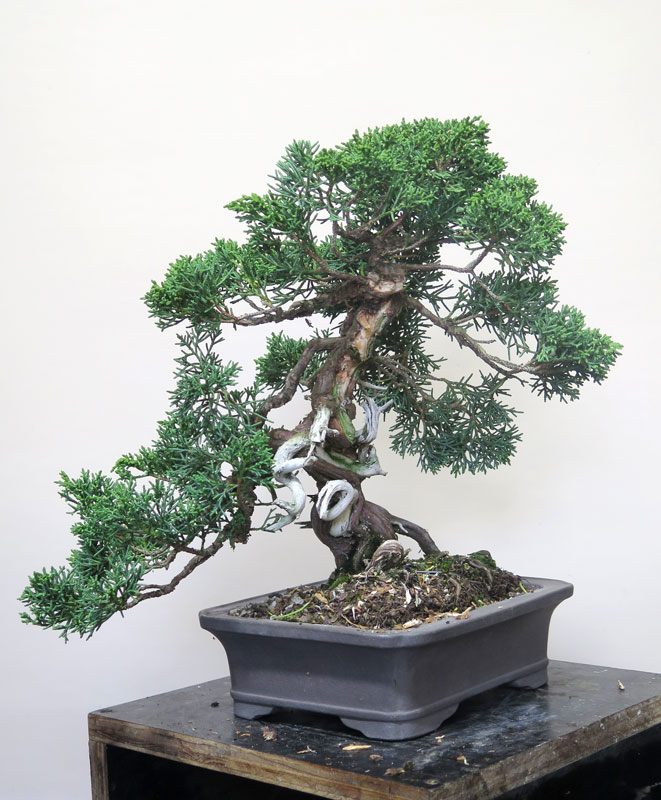
The tree in question is a bit of a rarity in Australia as you don’t see many (if any) Japanese white beech or Fagus crenata around, particularly any that are developed bonsai.

This example was imported from Japan when it was much easier to bring things into the country. There were still stringent processes to follow but it was somewhat less expensive or as regulated as it is today. This tree came in along with many others during this era, many of which are still out there if one looks hard enough.

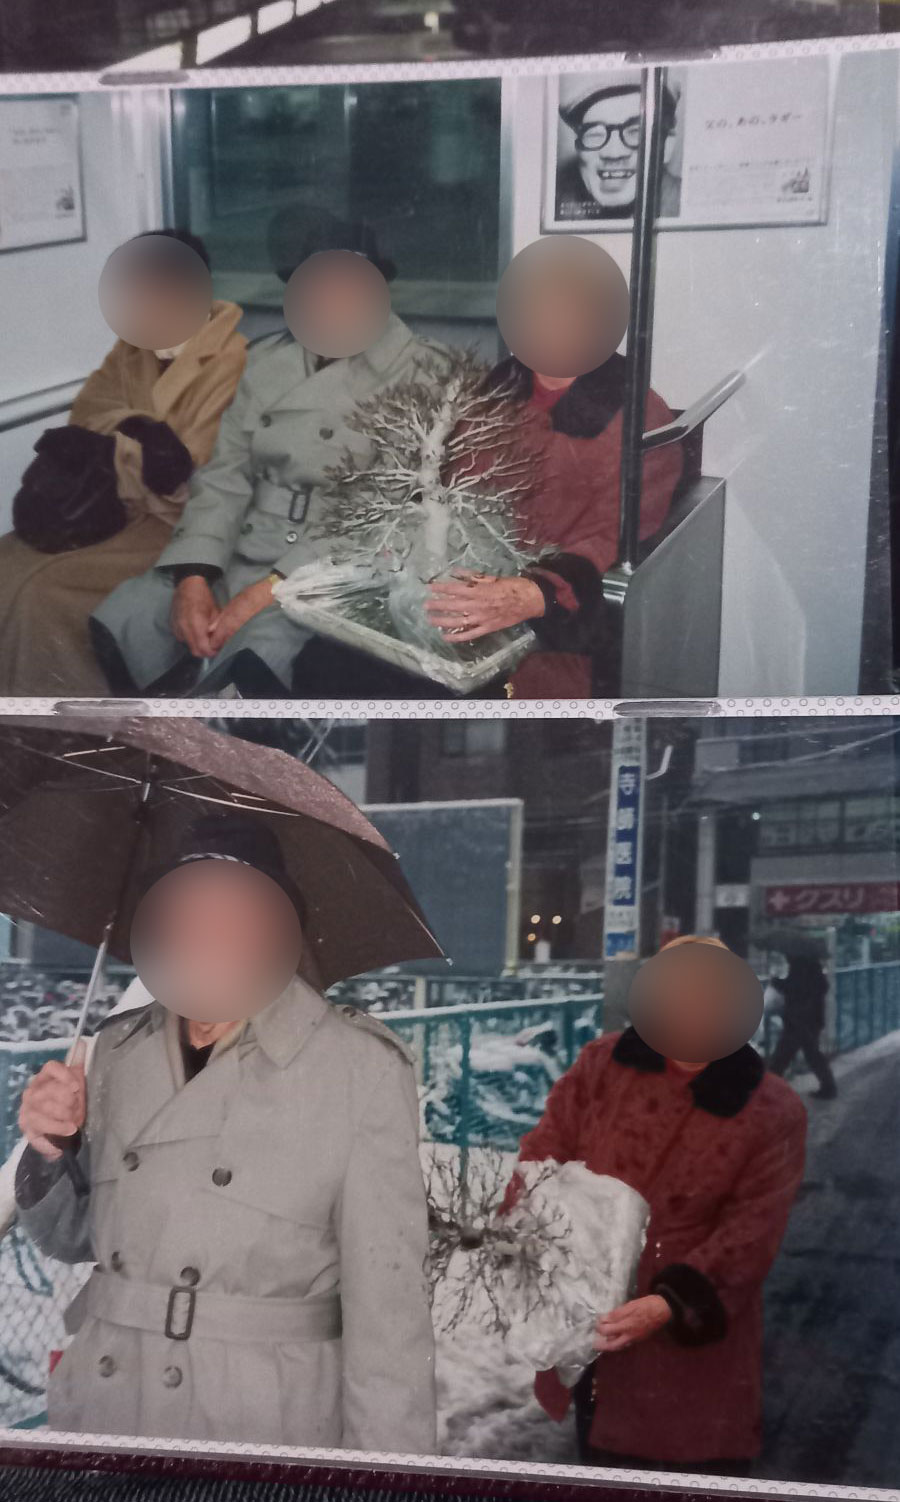
Recently I was lucky to get some photos of the tree riding the subway back when it was first purchased in Feb 1999, some 25 years ago. Getting these images spurred me to look back over the few photos i had of the tree showing it’s history while under my care.

The tree just after purchase in Japan, Feb 1999.

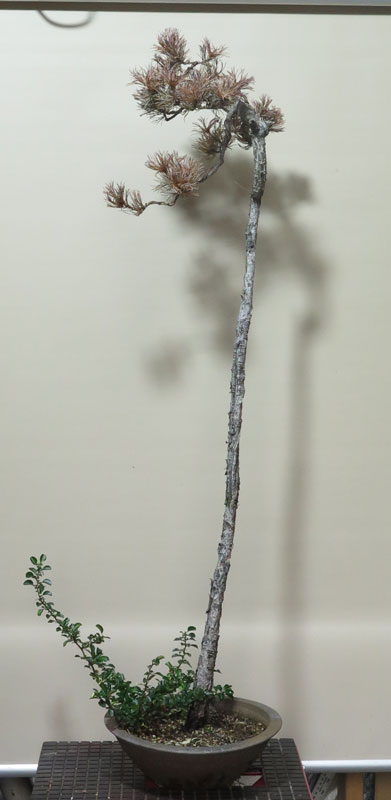
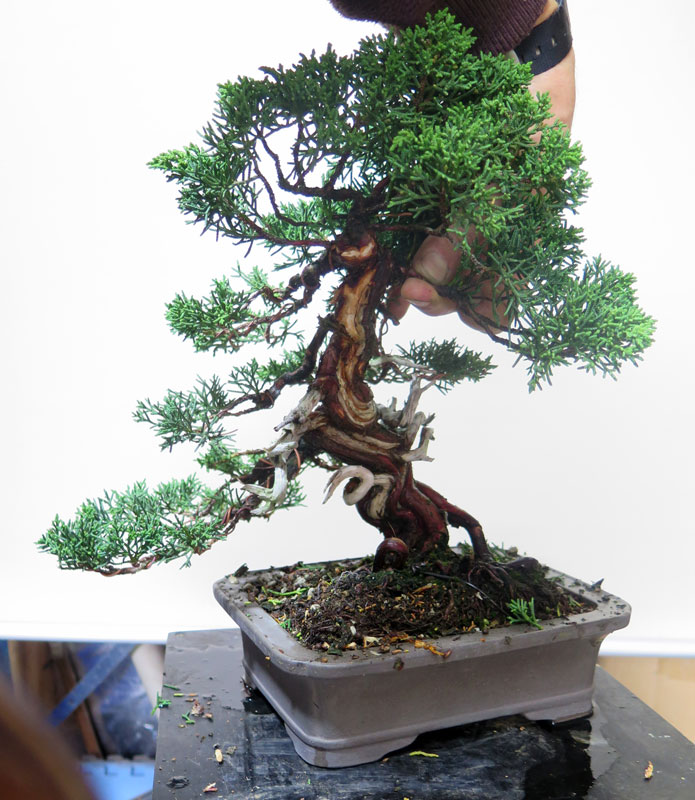
I was very lucky to get the opportunity to purchase the tree back in 2014 or 2015. Unfortunately the tree had weakened and lost its head along with quite a few branches. I must have been over excited at the time as i didn’t take any pictures on purchase but below is a picture from 2015 after I had removed much of the dead branches, twigs and apex.

2015, after re-pot and a prune removing dead material. This must have been a year or two after i got the tree. Note all the pruning scars from the removal of dead material.

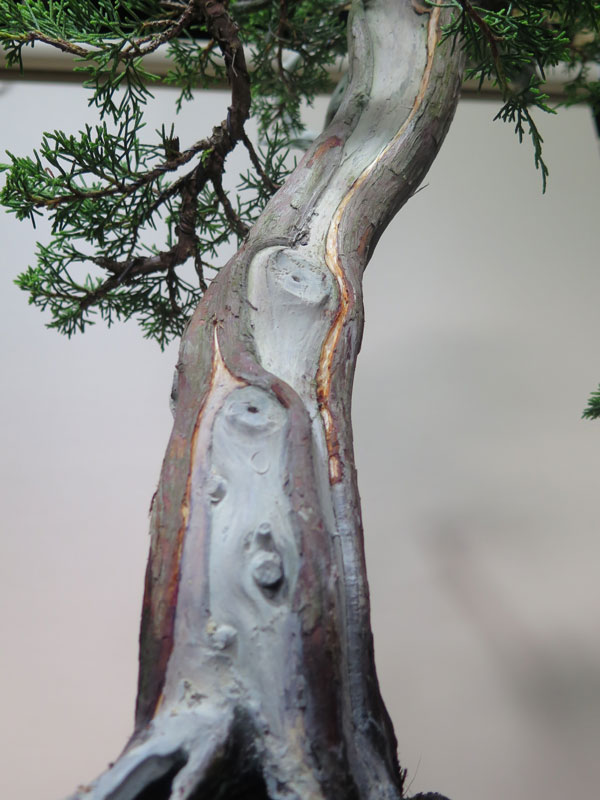
Turns out i was in a bit of a hurry to get it into a nice pot. I also changed the original front as the die-back had effected both the major branching and top 1/3rd of the tree forcing a re-think. (if you look closely at the above image you can see the large scar from where the old continuation of the trunk line that died was.)

I hadn’t grown beech before and was shocked after my first season at just how slowly trees that only have a single flush of growth were to develop.

It’s first year it didn’t really gain much vigor so it got up-potted into a large terracotta pot so it had some more room for roots in the hope this would speed up the recovery.

From there it did slowly gain some strength but it always felt so painfully slow as i tried to rebuild a canopy and branch structure.

The tree in 2020. Noting this is 5 years development from the 2015 image above. SLOW!!!!

It did improve though, i wired it a few times and set about trying to get some thickness into the lower branches as i rebuilt the top of the tree. I think when i shifted from town supply to rainwater was when the tree really strengthened and built up some real momentum, although it was still slow compared to deciduous trees with multiple flushes of growth.

Autumn, 2024

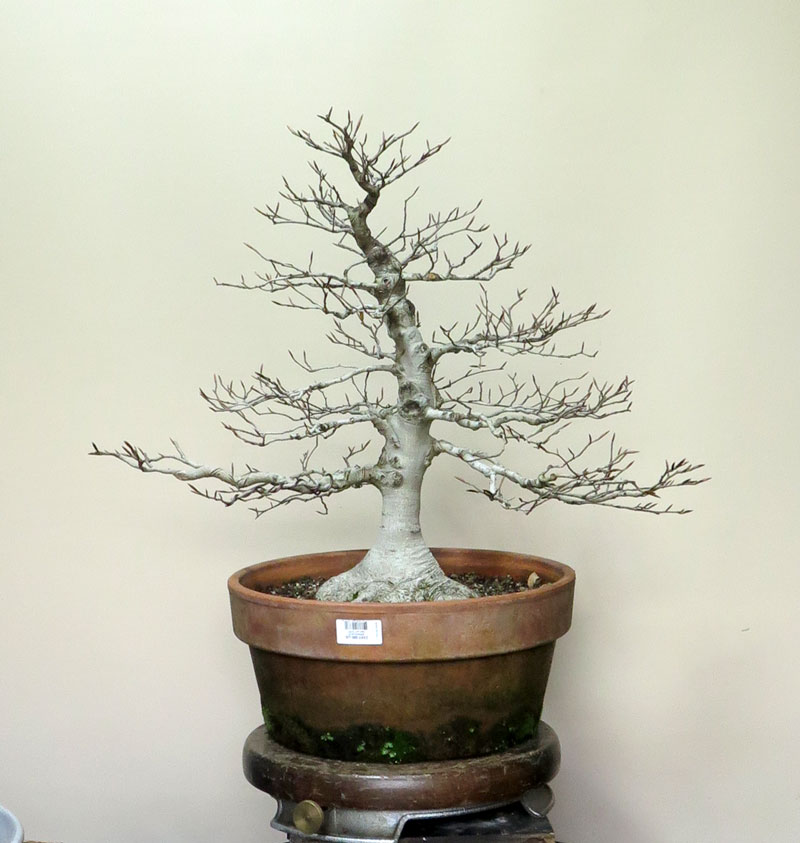
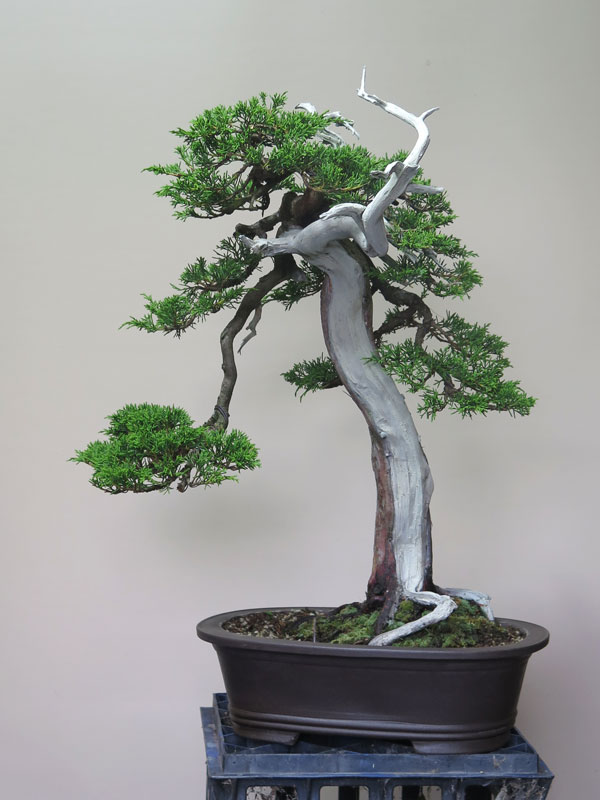
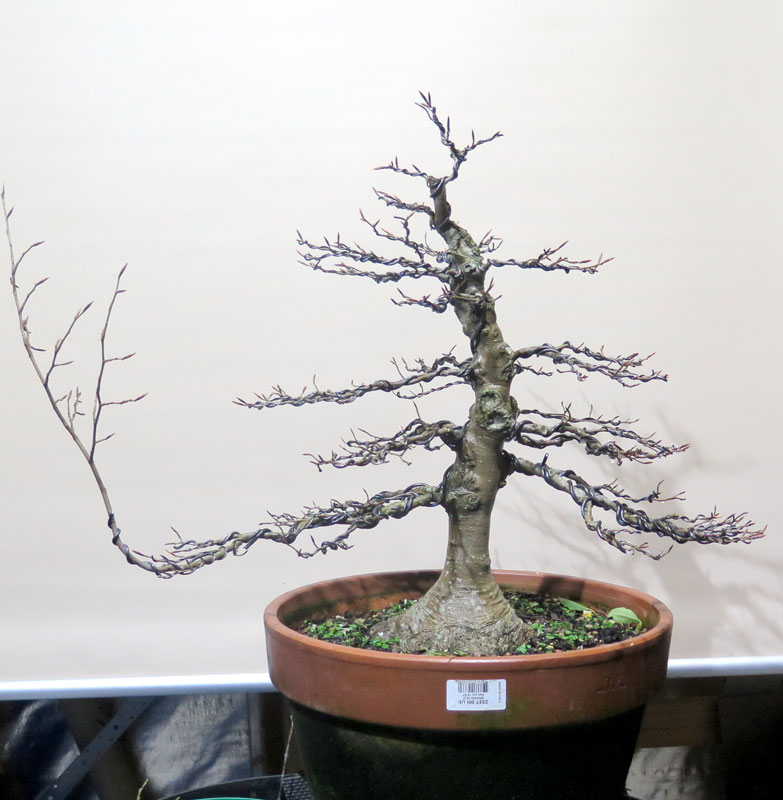
Which gets us to today. The tree is finally strong and even had a second flush of growth in some areas this year.

It has taken 10 years to this point just to get to the above image. Looking at it when it was purchased in 1999 i think it was more ramified than today so i am probably a few years off where it was on original purchase 25+ years ago.

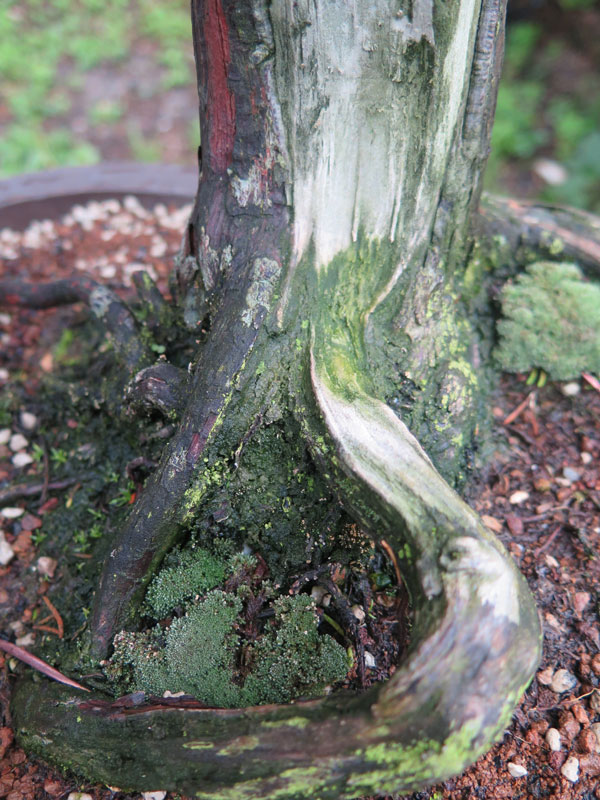
It unfortunately does still carry a number of large pruning scars on the trunk. They are healing, but slowly. I think this spring i will re-cut the edges and encourage them to roll over more quickly. The scars will likely be a ‘fault’ on the otherwise smooth and silky white trunk line for years to come but i can live with them.

I am not entirely sure when it will get it back into a bonsai pot. Ideally i would like to triple the ramification before hand but we will see. It will likely still be several years away. People are always in a hurry to get things into bonsai pots but there is something cool about good trees in training pots. It’s quite a flex.

I think the below sketch is what i am shooting for prior to it going back into a bonsai pot. I think it’s achievable in 3 more years. I’ll try to check back in then and see if my theory proves correct. That should see the branch structure fully built out, then moving the tree into a shallow bonsai pot should then help to build a finer layer of ramification to really fill out the canopy.

A imagined projection of the next few years development.

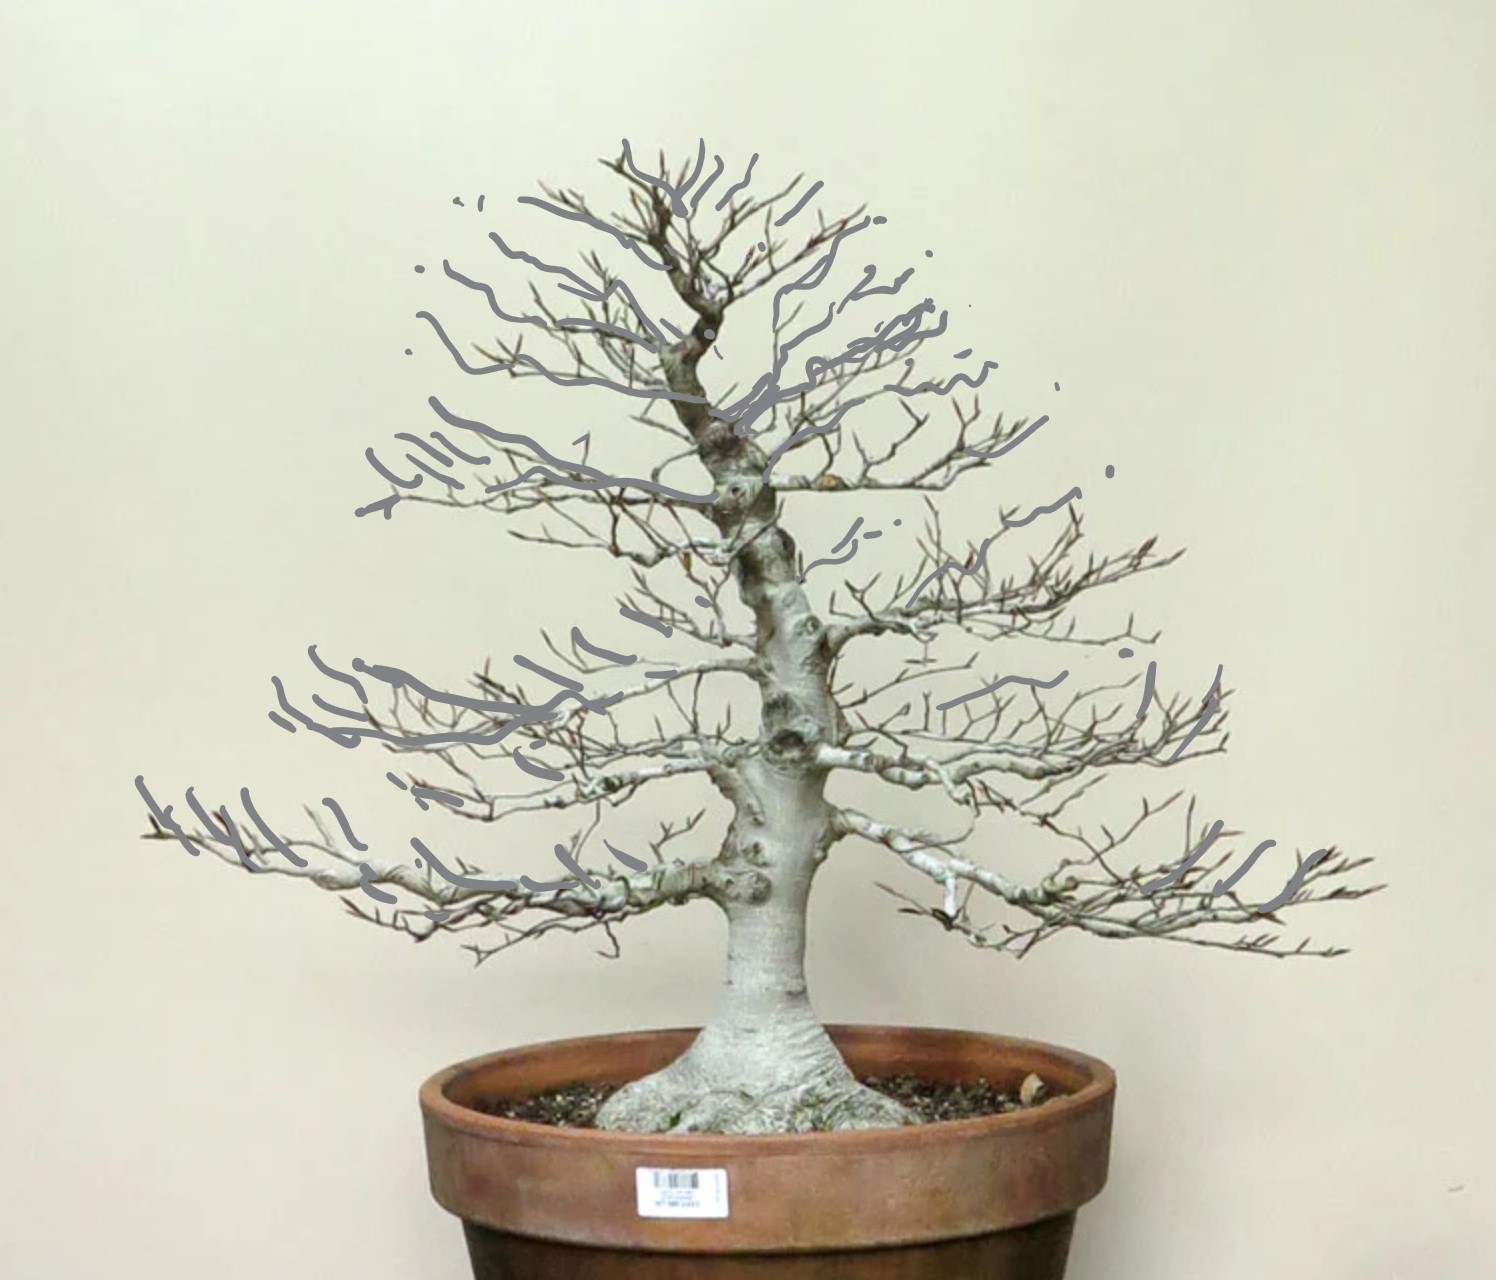
While a long process thus far, it is now fairly satisfying looking back at the earlier images and seeing how much closer to being repaired the tree is. I am also pretty excited to move it towards the above sketch which i think would signify a completed rebuild. I could then try to take the tree beyond where it was 25 years ago back in Japan.

It’s been nice looking after a tree that has a long history like this. It’s been in Australia for at least 25 years and who knows how long it was developed in Japan prior to export (perhaps 30 or 40 years?). We as a country are only really recently starting to see second generation trees being passed from one caretaker to another. There was a time when this was regarded as cheating suggesting you needed to grow everything from a tree’s beginning as stock, seed or cutting. Thankfully this attitude seems to have fully disappeared which i think marks a real maturing of the bonsai community in this country.

A tree like the above really reinforces this as its has passed through several growers, each adding their mark and looking after it ensuring it moves forward through time.

Does anyone out in the internets know of any other Fagus crenata bonsai in Australia? I’d love to hear about them in the comments or via email. Does anyone have old exhibition images of this tree? I know it was shown in Melbourne from time to time. I would love to collect some more of it’s history if it’s out there.

I lost a tree this year. It died in unusual circumstances and rather quickly, deteriorated after a single hot day.

People don’t tend to talk about the failures, the broken branches, the missed waterings or the mysterious die-back, it’s much easier to instead focus on the successes, the glossy pics, healthy foliage and triumphs. But we have all had failures, If you can find a bonsai grower that hasn’t killed a plant, you have probably found a liar. It happens. Some times it happens for very obvious reasons that you can solidly blame on yourself for but sometimes it seems a mystery.

Regardless of the reason, there is always a lesson to be learnt.

Which is where the below tree comes in.

Above: Dead…….

The tree above was a white pine, that I had originally dug from a forestry plot and grafted white pine onto. I think from memory I dug the original stock in 2019 or 2020 with the graft being placed the season following digging it.

The graft grew out and i was able to remove the original foliage a season after the graft had been done.

The White pine foliage grew really strongly and well up until early this summer. It had flushed out strongly and seemed to be growing well until we got a single hot day and the tree’s fresh needles yellowed and browned and the tree then died.

The hot day in question wasn’t a record breaker but low 30’s(c). I wouldn’t have expected that sort of heat to have this effect on the tree in question, and it had survived well much hotter temps in previous years. The Chojubai cutting that was planted at it’s base also showed no sign of heat stress either. Strange.

I suspected a failed graft union.

So i decided to dig a little deeper into the graft. The below details my un-scientific autopsy of the graft union. I essentially cut a number of slices through the graft to see what was going on inside and below the bark as per the below images.

Above: you can see the swelling at the graft union site. The white pine above the graft grew very strongly and swelled each season while the trunk below the graft didn’t seem to swell at all, perhaps an early warning sign I didn’t click to.

Above 3 Images: Various depth slices through the graft reveal some interesting things. There appears to be some bark inclusions within the graft and the cambium layers do not seem seamlessly knitted together. I wonder if the swelling was caused by a disruption in sap flow between the two sections of trunk?

My theory is that there was only a small section of connected and functioning cambium layer that as the trunk grew and swelled slowly got pulled apart. All it needed was the added stress of a hot day and the graft was not able to keep up with the sap supply…….. and hence a failure.

Googling ‘graft incompatibility’, brings up images that match mine above. The reasoning for the failures are varied and range from species or variety incompatibility through to poor craftsmanship of the graft itself.

As the stock tree was an unknown forestry hybrid, white pine may not be a good species match, but there is also every chance that my graft was not executed or aligned correctly to begin with also. Either way it failed and the graft itself showed some warning signs leading up to the failure.

For my future grafting projects i now have a better understanding of what signs to look out for (adverse swelling for starters) and can plan some contingency should these issues arise again.

If anyone has more knowledge or insight into the images above, i would really appreciate you adding a comment below so I can learn more.

With a new year upon us it marks a good time to change things up a little.

At the start of spring, Evan Marsh put me onto a cheap dosing attachment available from our friendly, faceless multinational hardware chain.

The easy way to feed!

It has been a good addition to the garden so far as it’s ease of use has really upped the regularity of my feeding and all my trees are showing excellent health and growth as a result.

I always liked to think that i fed regularly but when i though back to when my last weekly feed was it was often months ago……. This new dosing attachment makes the process so simple and convenient i have been able to feed as i water and it has kept me to my intended schedules much more easily.

For those interested, THIS is the product in question, the Holman ‘Quickmix’ spray gun.

After the Quickmix discovery, then came the task of deciding what fertiliser to use. I tried some of my usual go to liquid feeds but their paste like consistency clogged some of the jets and just generally didn’t feed out very well in the Quickmix.

So after very little experimentation I have landed on the below system:

From Right to Left: Right – 2 part hydroponic fertiliser concentrate, middle – 2 part fertiliser pre-mixed, Left – Holmann Quickmix.

The fertiliser itself is intended for Hydroponics so has a good spectrum of nutrients and minerals but requires some preparation prior to use. It is a 2 part system where you need to mix a ratio of the crystals and water into 2 parts prior to combining the two into the Qickmix before you feed. It is my understanding that some of the minerals will re-crystalise if you leave the 2 parts mixed for any period of time so best to mix the two prior to feeding.

To use the Quick mix i add about 5mm of each 2 part solution tot he Quickmix and top up the bottle with water. Then i simply water using the gun. The gun has some adjustment for the dosing rate but as i have lower pressure from my water tank’s pump i just use the maximum rate. (more details about the dosing rates on the Holman website)

I have made my pre-mixed solutions in 2x 500mm bottles. I have been feeding each week and have so far used less than a 1/4 from each bottle. This stuff goes a long way! For $25 i think i will get several years worth of feeding done so i cant complain on the value side of things. All in all i am very happy with the system thus far. This combined with a slow release seems to be covering all the feed needs i have for now.

Some of the finer details

Just a quick update on how this tree is developing. It was in the workshop recently for a cleanup (mainly as an excuse to play with THIS).

It is proving to be both a really useful and fun tool to use around the collection. It’s an amazingly quick way to clean up deadwood, remove built up muck, staining and compact dirt from trunks and roots and even stones. Ive had trident maples with dark staining on their lower trunks for years, this is the first season they are clean!! Its a tool that is well worth the investment if you have similar tasks in your own trees.

The above comparison shows what 2 minutes can do with one of these tools. You can probably also see that it has removed a lot of the rotten, punky deadwood in the process leaving behind the harder heartwood which has saved another task. All i will need to do is a final hand clean and we are ready for a new coat of lime sulphur.

I am going to also give this ‘Alchohol & Resin’ wood hardener a go this year and see how that works in some of the more prone to rot areas.

As for the tree itself, it is building momentum and developing quickly now and i am contemplating on displaying it at a local show mid next year if it continues to go from strength to strength and i can get all the foliage as developed as the lower first branches pads are.

Its an interesting tree to look at over time as per the images below:

So back to the work, after a good cleaning the shari and deadwood was re-limesulphured and the bark somewhat cleaned up. Its growing into a nice tree.

Above: some small additions to the shari.

While I had the tree on the bench i also thinned and shaped the live veins a little on the rear of the tree to further define them and ideally encourage them to ‘plump up’. Afterwards I gave the shari areas and jins a good fresh coat of lime sulphur and added some moss while I waited for things to dry. As I was applying the moss i also pulled and tied down the root on the left side that was hovering above the soil surface which I think was an easy improvement to make.

Above: After the work.

Next time this tree is on the bench I need to remove and likely re-wire the foliage and branching, but I am going to wait for things to fill in a little more before I do that, maybe next month’s task.

This year i finally feel like my pines are thriving after a long period of mediocre growth. This bad growth was due to a number of factors including:

  • water pH Issues – Solved by moving to rain water.
  • soil mix – I have recently moved to Akadama, Pumice and Scoria and believe this is a good improvement.
  • fertiliser regime – This year i am using a two part hydroponic fertiliser and am applying weekly, and;
  • strange seasonal variation – We have been in an ‘El-nina’ phase which resulted in cool wet years which even threw my tomato crops off kilter amongst other things

Most of the pines have been grown out last year and skipped de-candling to build their strength and from the below pics you can see they are responding well this year.

The Radiata is a fairly new addition to my garden after not having one for a while. I am treating it more like a Japanese White pine in regards to foliage management and so far am seeing good results. The process is essentially:

  1. Grow out the spring flush.
  2. once it stops extending, prune back leaving some of the new candle’s growth.
  3. New shoots form and grow out
  4. Thin needles
  5. Prune back new shoots to two and reduce length as per Step 2.
  6. Repeat.

I am guessing i will get 2 or 3 flushes per year using this method. So far needles have not come down in size much but as i build more canopy i assume this will slowly reduce the length.

I probably also need to play around with feeding timing but at the moment i am focused on building branching so am feeding heavily. A post for another day.

With some down time over the Christmas holidays, I finally got around to re-styling THIS TREE. It had been growing mostly untouched for a couple of years and had well and truly outgrown its former style.

Above: How it began.

As it had been left to grow a lot of the growth had become leggy and a lack of routine thinning had left fewer amounts of interior growth than i would have liked.

To get started, I began by pruning. I thinned and removed heavy and unneeded branching, upward and downward growing sub branches, thinned the foliage and generally cleaned up the structure.

Above: Half way through the pruning.

As I worked I also started to play around with new front angles and didn’t mind it from a slightly counter clockwise rotated position.

Above: the branch that met an early end.

I began to wire as I pruned so i could get a better sense of what branches I needed and what could be cut off. All was going well until i made an error. I wasn’t paying enough attention and when I cut off one of the branches in the top of the tree it was difficult to see from my angle that there were two branches in the branch cutters jaws…….. and as a result, i cut the key branch on the right side off.

Well, what was done was done so I continued wiring and worked a front that was much closer to the original. I was pretty annoyed with myself but there wasn’t a whole lot I could do. All in all everything was not lost but i was kicking myself for making such an avoidable mistake.

Above: Post wiring

The ‘finished’ result is a good place to be for now. The styling is pretty sparse due to how much foliage and branching i removed but the trunk and deadwood are now very much more prominent.

Above: the obligatory deadwood close-up

You can probably see that the wiring I applied is only on major branches and sub branches. As this is a restyling, I will need to develop the foliage over the next 12 months or so to fill in and tighten up to this new style, so I didn’t bother fine wiring and hence the slightly scrappy appearance.

Above: the original front, natural light and a hand for scale.

As the canopy fills in i think i will further fine tune the front. As you can see from the above image that original front is not bad but i still think i prefer the one i ended up with that is slightly rotated anticlockwise. We will see if this changes as i grow some of the branches and get some more width to things (something that i wouldn’t have to wait for if i hadn’t cut off that key branch!)

It is interesting comparing this and my other small Kishu to the itoigawa i have. It is certainly more difficult keeping these kishu small and compact compared to the itoigawa. That said, the branching stays much finer on these so i guess you have to take the good with the bad.

Next post might be an update on one of my itoigawa trees…. we will see.

For those of you familiar with Japanese bonsai nurseries and their workshops, you would likely have seen small pressure washing guns used to clean shari, particularly on small and shohin sized trees.

I had looked at buying and importing one from Japan a number of years ago but the 110v power that Japan uses was not compatible with Australia’s 240v system and by the time you added up the couple of hundred dollars for the gun, a power step down transformer, and shipping; a toothbrush / wire brush and glass of water started to look like very competitive options.

Cut to a little while ago, Evan Marsh, put me onto the below product. Its a textile stain removing pressure washer, easily available from ebay as a ‘textile spot cleaning gun’ for around $70 shipped (at time of posting). If you are looking for one, hunt down the 220v model for Australia’s power as it should come with the correct plug.

After receiving mine i was pleasantly surprised at how good it was. It is so powerful i would highlight the danger of it. DO NOT TEST ON YOUR FINGERS (like i did, and now have bruised my finger tips even though i was about 50cm from the nozzle.!!!) I think its stream has by far enough pressure to give pressure injection injuries. A quick search of that term will reveal horrific images that hopefully will cement in your brain not to point this thing at your self or anyone else.

The strong jet this gun produces however is great for cleaning and stripping moss, dirt and grime and other stuff from deadwood areas. Especially in hard to access places.

I would also think you could remove pulpy or rotted areas of deadwood easily in a way that leaves behind a natural texture when done also. It likely has enough power to damage bark and live areas so be careful.

All in all this tool appears really well made for the price and performs great. If you struggle to remove moss and algae from your deadwood it may be a cheap way to solve that issue.

Just a quick update on this tree.

I spent an evening candle cutting the new years growth with the future shape of the canopy in mine, leaving shoots i wanted to extend uncut and trimming back to leave a short section of new growth on areas i didn’t want to extend too much.

Its a bit of a fun process as you are constantly thinking to the future of the tree, what needs filling in, what needs lengthening etc, while at the same time reigning in the new season’s somewhat messy growth. I did wire a couple of branches thinking i could get away with just adjusting a couple of things but as is always the way it just highlighted further things that need adjusting…… likely meaning i need to fully re-wire at some stage.

Above: 2021 on the left, 2023 on the right.

Yet another one to add to the ‘needs to be wired list’. This tree has a long way to go but is slowly filling in and improving each time I work it. It’s a strange tree for sure but i think that’s why i often catch myself gazing at it on my benches. I like the weird.

As far as future plans, i think the below badly done photoshop is along the lines of where I’d like to head. That said knowing how i do things, i very likely will change my mind along the way. We will have to see at the next update………..

A potential future.

Just a quick post today tracking a task I do on the semi regular to develop the junipers that have deadwood and shari features.

Above: a small shimpaku Juniper I have been developing for a number of years.

Above is yet another of my trees in desperate need of a wire. While I didn’t wire it today, iI did do a little thinning of the foliage in preparation for summer growth and a future styling. The main task i completed however, was the widening of the shari’s on the tree.

If you’re interested in seeing the tree 10 years ago, HERE’S it’s first post.

I do this task every couple of years to slowly reduce the sizes of the live veins which speeds up trunk thickening (or more like widening) and develops the shari’s texture.

The technique it’s self is fairly straight forward and involves removing a couple of mm of bark along the edges of the shari. It is a fairly safe process as you have to be pretty unlucky for the branches above to be reliant on the narrow strip of bark but it does pay to make sure that you are not removing all of the bark from directly below branches.

You can see the freshly exposed shari in the images above.

By reducing the size of the live vein you direct the same amount of sap (to supply the foliage above) through a thinner section of bark and as a result it tends to thicken in this area much more quickly compared to a larger area of bark supporting a similar amount of foliage. If you then have live veins on each side of the trunk they will grow outwards and appear to thicken the trunk much more quickly (if only in one side to side dimension.)

The other benefit of doing this technique over time is that you get a great texture on the shari areas. As you expose these new areas of shari, you are exposing younger heart wood and as a result you get lines appearing between the younger and older area of shari. You can see this quite clearly in the images above where there is a year or two age difference between each line. You can end up with an almost finger print like pattern on the shari with no need for carving and its a fairly effortless way to achieve a nice texture.

This is a maple I have been working on for some years and you might have seen on the blog before (2021 update, and 2013 update).

It came into the workshop recently (where i forgot to take before pics) and I gave it a structural prune. It really needs a full re-wire but overall I am pretty happy with the branch structure and development.

The Maple post pruning looking a little moth eaten.

If you compare the tree now to some of the previous posts you can see quite a bit of development but then again i think I first started working this tree in 2013 so 10 years have passed so i would expect some change (and perhaps more development).

It had been somewhat neglected the last little while and particularly last year where it was overdue for re-potting and i ran out of time to do it.

Neglect and too much sun = dieback.

As a result in the heat of summer I had some root issues and the tree suffered some die-back on the nebari. It was not a good result and entirely my fault. Well, lesson learnt and now i will have to spend the next few years healing the scar and will consider wrapping the roots in a towel or cloth to give some sun protection on our hottest parts of the year.

The tree still has a way to go but each time i work on it i can see the improvements. I am looking forward to giving it a full re-wire this Autumn.

Enter your email address to subscribe to this blog and receive notifications of new posts by email.

Join 673 other subscribers

Contact me

nichigobonsai***gmail.com

Note: to use email address, substitute *** with @